0
comments
ClockWorkMod (CWM) >
Recovery Modes >
Rooting >
Tips >
Tools >

From the meaning of CWM, the differences between the STANDARD recovery mode and CUSTOM recovery mode (CWM), finally, to the benefits of using CWM on your Android device – all have been discussed in my previous article.
Right now, as I promised to you in my previous post, I’m about to give you my step-by-step guide how to back up the Android system of your tablet by using CWM custom recovery mode.
But of course, in order for your device to have the ability to ‘backup’ your Android system, you must firstly have the CWM custom recovery mode installed on your Android tablet.
And for your information, installing CWM can be pretty complicated as this process also requires you to root your Android device in the first place.
So before learning about how to create the backup of Android system with ClockWorkMod, today I'm gonna share to you first about how to install the CWM custom recovery mode to replace the STANDARD recovery mode of your device.
Okay then, without further ado, here you go, my very first guide, or tutorial if you would, about installing CWM custom recovery mode on your Android tablet/smartphone.
BUT REMEMBER! DO THIS AT YOUR OWN RISK! SO I'M NOT RESPONSIBLE FOR ANYTHING WRONG THAT WILL HAPPEN ON YOUR ANDROID DEVICE.
WARNING!! Do this at your own risk!! I will not be responsible for anything wrong that might happen on your device!
1. Root your Android Device
Well, as mentioned above, in order to be able to replace the STANDARD recovery mode with the CUSTOM recovery mode like CWM, your device MUST BE ROOTED FIRST.
But if you still don’t know how to root your device and the consequence of rooting your device, then you can go check out my other new post about “how to root your Android device?”, which I’m about to publish in the next few days.
So be sure to stick around!
2. Search the right IMAGE FILE of CWM that is compatible
Okay, after rooting your tablet and it’s already been validated with an app called “Root Checker”, now you can proceed to the next step of installing the new CWM custom recovery mode in order to replace the STANDARD recovery mode of your tablet.
However, before proceeding to the next step, first you need to find the specific ClockWorkMod file for your device around the web. And that’s because every Android device available on the market has their own CWM recovery image file.
So if you install some random CWM file that is NOT compatible with your tablet/smartphone, chances are, there will be some errors happening when you enter to the recovery mode, like dark screen where you cannot do anything here.
I strongly recommend you to go check out XDAdevelopers.com forum and search for the keyphrase “CWM YOUR-DEVICE-NAME-HERE” in order to find the right CWM file that is compatible with your tablet.
For example, “CWM Google Nexus 10” or “CWM Nvidia Shield Tablet”.
Alternatively, you can also download an app called “ROM manager” on Google Play Store as this app also provides some custom recovery modes (like CWM, TWRP, etc) that you can easily install on your device.
But remember, this is the PLAN B! So you must focus on finding the right CWM image file that is compatible specifically with your device around internet.
3. Put the CWM file on microSD card
So after getting the exact CWM file that is compatible with your device, now you need to put the image file of CWM (CWM.img) in your microSD card.
But remember, you should put the file right in the root directory of your microSD card, NOT INSIDE ANY FOLDER. By doing this, it will make it easier for you later to find that file for the next step.
4. Download “Rashr” on Google Play Store
Okay, next you need to find an app on Google Play Store called “Rashr” and then install the app on your device. But this app requires a rooted device in order to work. So if your tablet/smartphone hasn’t been rooted yet, this app CANNOT work.
5. Rename the CWM file into “recovery.img”
Okay, back to the CWM image file that you just downloaded and put inside the micro SD card (in the step number 3), the next thing you need to do is rename the CWM image file into recovery.img.
The image file of ClockWorkMod usually has a standard name “CWM_Philz.img”. So you just need to rename this file into recovery.img. Simple, isn’t it?
6. Open Rashr app
Now open the Rashr app that you just downloaded from Google Play Store and let the app take you to the first interface which shows you some options that you can apply on your device.
But be very careful to not press some random actions here because it will have a huge impact to your device.
7. Find the CWM file using Rashr
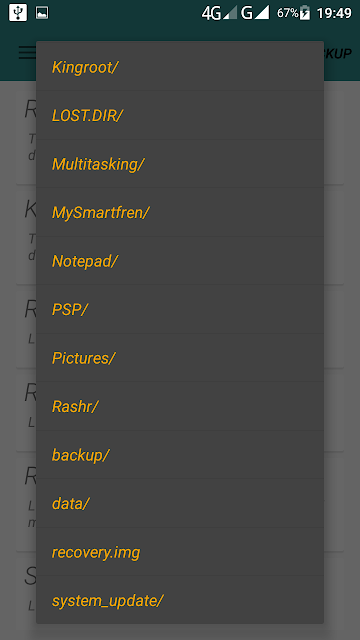
Okay, inside the app, you will be presented directly with a bunch of options. Press the first option “Recovery from Storage”. After pressing this option, a new window is opened showing you the list of folders on your storage.
Now scroll down to the bottom and find the file called “recovery.img”.
** However, if you cannot find that file, then it means this Rashr app probably cannot detect the “recovery.img” file on the default storage. **
So you need to move that “recovery.img” file from microSD card to internal storage (or the other way around, from internal storage to microSD card).
Okay, now open your file manager (file explorer) on your device and then move the “recovery.img” file from microSD card to internal storage using “Cut” function.
Now open again the Rashr app and press the option “Recovery from Storage”. I believe now you can find the file through this app.
8. Flash the "recovery.img" file
After finding the “recovery.img” file, now flash that file by pressing it.
There will be a warning prompted “Choosing recovery.img? Are you sure?”. Don't worry, now press the “Yes” button.
9. Reboot to the CWM custom recovery mode
Okay, after having succeeded flashing the new CWM on your device, now you can reboot to the recovery mode.
You can actually do it right away from the Rashr app or you can do it manually by turning off the phone, and then turning it on again by pressing VOLUME UP BUTTON + POWER BUTTON at the same time.
I personally prefer to reboot to the recovery mode directly from Rashr by pressing the option “Reboot Recovery”. This is actually much simpler than doing it manually with VOLUME UP BUTTON + POWER BUTTON.
10. ClockWorkMod has been successfully installed
Okay, congratulations, now you have already installed CWM and replaced the standard recovery mode of your Android device with the new CWM custom recovery mode.
Now you can do a lot of things with this new ClockWorkMod custom recovery mode that you CANNOT do earlier in the STANDARD recovery mode which comes pre-installed with your Android device.
With this ClockWorkMod custom recovery mode, now:
- You can backup the Android system of your tablet/smartphone
- You can restore your Android system if your device cannot boot up normally to the system (bootloop)
- You can flash some new apps to enhance your device like Dolby Audio, Lenovo camera app, etc.
- You can also flash the new SuperSU app to replace the Kingroot app that you installed earlier to root your tablet.
ClockWorkMod (CWM) >
Recovery Modes >
Rooting >
Tips >
Tools >
Related Posts
Recent Updates
Our Top Picks


